Pelvic Floor Exercises for Pregnant Women – 10 Effective Training Guides

During pregnancy, the pelvic floor muscles endure increased pressure as the baby grows. Maintaining and strengthening these muscles not only helps prevent urinary incontinence but also supports a smoother delivery and faster postpartum recovery. In this article, we outline ten specific exercise routines designed especially for pregnant women to improve pelvic floor strength, support labor, and aid in postnatal healing.

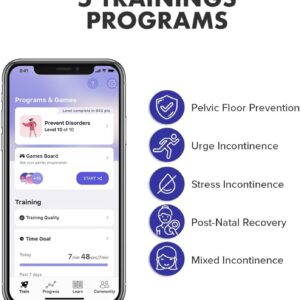
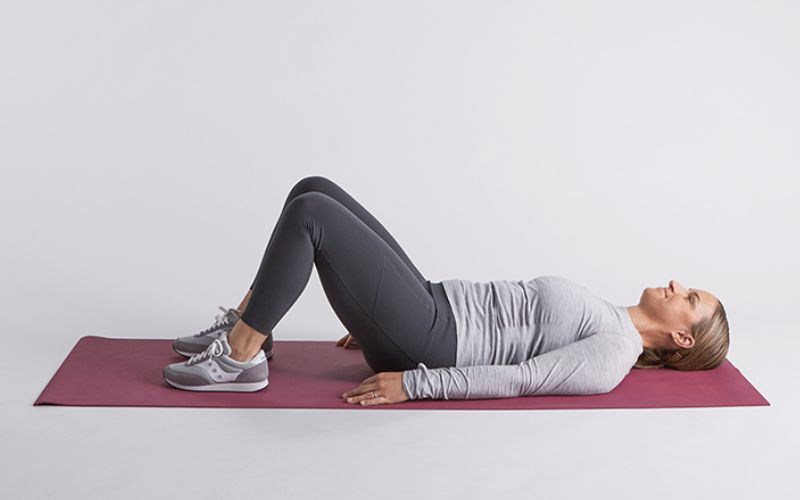
1. Basic Kegel Exercise

Purpose: To identify and engage the pelvic floor muscles.

Instructions:

  • Step 1: Imagine you are trying to stop the flow of urine. The muscles you contract to do this are your pelvic floor muscles.
  • Step 2: In a comfortable seated or lying position, contract your pelvic floor muscles for 5 seconds, then relax for 5 seconds.
  • Step 3: Repeat this cycle 10–15 times per session and aim to do it three times daily.
 

2. Advanced Kegel Exercise

Purpose: To increase the duration of contractions and enhance muscle endurance.

Instructions:

  • Step 1: Start with the basic Kegel routine.
  • Step 2: Once comfortable, try holding the contraction for 10 seconds followed by a 10-second relaxation period.
  • Step 3: Perform 10–15 repetitions per session, three times per day.
 

Take your Kegel workouts to the next level with these recommended items

3. Bridge Pose

Purpose: To activate the pelvic floor, glutes, and lower back muscles.

Instructions:

  • Step 1: Lie on your back with your knees bent and feet flat on the floor, hip-width apart.
  • Step 2: Slowly lift your hips upward while squeezing your glutes and pelvic floor muscles, forming a straight line from your knees to your shoulders.
  • Step 3: Hold the position for 5–10 seconds before lowering back down.
  • Step 4: Repeat for 10–15 repetitions.
 

4. Cat-Cow Pose

Purpose: To improve spinal flexibility while gently engaging the pelvic floor.

Instructions:

  • Step 1: Begin on your hands and knees with your wrists aligned under your shoulders and knees under your hips.
  • Step 2: Inhale as you drop your belly toward the floor (Cow Pose), feeling a gentle stretch in your pelvic region.
  • Step 3: Exhale as you round your back upward (Cat Pose), relaxing the pelvic muscles.
  • Step 4: Repeat slowly for 1–2 minutes, focusing on smooth, controlled breathing.

5. Gentle Squats

Purpose: To strengthen the thighs and pelvic floor simultaneously.

Instructions:

  • Step 1: Stand with your feet shoulder-width apart, keeping your head up.
  • Step 2: Slowly lower yourself as if sitting in a chair, ensuring your back remains straight and your knees do not extend past your toes.
  • Step 3: Focus on contracting your pelvic floor muscles as you squat.
  • Step 4: Return to the standing position.
  • Step 5: Repeat 10–15 times, performing 2–3 sessions per week.

6. Pelvic Tilts

Purpose: To relax and increase flexibility in the pelvic area.

Instructions:

  • Step 1: Lie on your back with your knees bent and feet flat on the floor.
  • Step 2: Contract your abdominal muscles to press your lower back into the floor, tilting your pelvis gently.
  • Step 3: Hold the tilt for 5 seconds, then release.
  • Step 4: Perform 10–15 repetitions.

7. Bird-Dog Exercise

Purpose: To enhance balance and engage the lower back along with the pelvic floor.

Instructions:

  • Step 1: Begin on your hands and knees.
  • Step 2: Extend your right arm forward and your left leg backward, keeping your back straight.
  • Step 3: Hold the position for 5 seconds, then slowly return to the starting position.
  • Step 4: Repeat 10 times on each side.

8. Side-Lying Leg Lifts

Purpose: To strengthen the outer thigh muscles and support pelvic stability.

Instructions:

  • Step 1: Lie on your side with your head supported by your lower arm.
  • Step 2: Keeping your bottom leg slightly bent, lift your top leg to about a 30° angle, then slowly lower it.
  • Step 3: Complete 10–15 repetitions on each side.

9. Clamshell Exercise

Purpose: To target the hip muscles and pelvic floor.

Instructions:

  • Step 1: Lie on your side with your knees bent and a small pillow between your knees.
  • Step 2: Keep your feet together as you lift your top knee upward, ensuring your pelvis remains stable.
  • Step 3: Hold for 5 seconds before slowly lowering the knee.
  • Step 4: Perform 10–15 repetitions on each side.

10. Gentle Yoga Sequence for the Pelvic Floor

Purpose: To integrate gentle yoga poses that relax and activate the pelvic floor.

Instructions:

  • Step 1: Begin with “Child’s Pose” to relax and connect with your breath.
  • Step 2: Transition into the “Cat-Cow Pose” as described earlier to warm up the spine.
  • Step 3: Move into the “Bridge Pose” to actively engage the pelvic floor.
  • Step 4: Conclude with a “Seated Forward Bend” to relax the entire body.
  • Step 5: Perform this sequence for 5–10 minutes, focusing on deep breathing and controlled muscle engagement.

Latest News

Hello world!

Welcome to WordPress. This is your first post. Edit or delete it, then start writing!

1 Comments

Welcome to Flatsome

Welcome to WordPress. This is your first post. Edit or delete it, then start blogging! [...]

Just another post with A Gallery

Lorem ipsum dolor sit amet, consectetur adipiscing elit. In sed vulputate massa. Fusce ante magna, [...]

A Simple Blog Post

Lorem ipsum dolor sit amet, consectetuer adipiscing elit, sed diam nonummy nibh euismod tincidunt ut [...]

A Video Blog Post

Lorem ipsum dolor sit amet, consectetur adipiscing elit. In sed vulputate massa. Fusce ante magna, [...]

Just a cool blog post with Images

Lorem ipsum dolor sit amet, consectetur adipiscing elit. In sed vulputate massa. Fusce ante magna, [...]

Another post with A Gallery

Lorem ipsum dolor sit amet, consectetur adipiscing elit. In sed vulputate massa. Fusce ante magna, [...]

New Client Landed

Lorem ipsum dolor sit amet, consectetuer adipiscing elit, sed diam nonummy nibh euismod tincidunt ut [...]